


I saw a Tweet by Kent C. Dodds recently where he mentions the Mock Service Worker library. Now that I’ve worked with it for a bit, I’m in love.
And it looks like a lot of other people are, too. MSW won the “Most Exciting Use of Technology” award at this year’s JavaScript Open Source Awards.
Let’s take a look at what MSW does, and how and why you should use it for your front end tests.
You want to avoid connecting to your real API when running your tests because...
- You don’t want to affect your production data when running tests and,
- You want to be able to control what the API returns depending on the test you’re running.
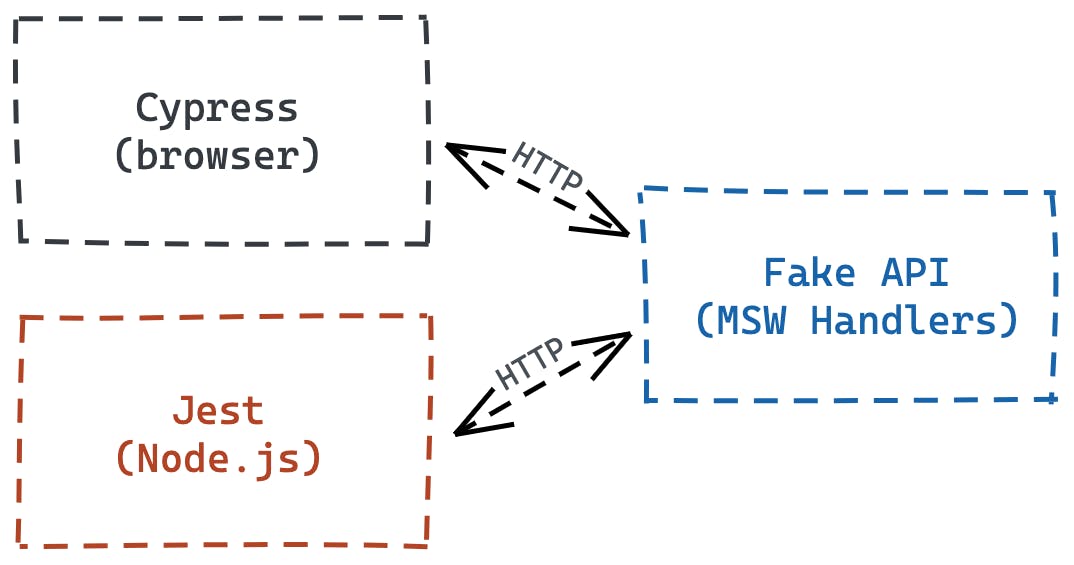
But your app still needs to interact with an API to function, meaning you need some sort of fake API to run, that emulates your real API. This is where MSW comes in.
You define handlers using MSW, and it’ll act as your real API, intercepting requests from your front end and responding to them using the handler logic.
But can't I just mock fetch?
Normally if you’re testing a frontend you’re usually either mocking fetch or axios, but MSW acts as an actual server, so your app connects to it as if it’s connecting to your real API.
This means your app isn’t even aware that it’s connecting to a mocked API. To your app, it’s just another day at the office. This guarantees identical behavior in your tests and in production. So...
- You’re testing your frontend in as realistic a way as possible and,
- You’re also testing how your code is used, rather than how it’s implemented. If you change your data fetching library, everything will still work.
Let's get started!
We have a todo list app that uses the SWR library to fetch a list of todos. It also uses fetch to make a POST request when we insert a todo.
Check out the live example here. (Tasks you insert here are private to you and aren't shared with other users.)
Start by cloning the repo to follow along:
git clone git@github.com:jacques-blom/taskhero-web.git
cd taskhero-web
yarn
Step 1: Set up Mock Service Worker
First, let's install the MSW package.
 npm install msw --save-dev
 # or
 yarn add msw --dev
Next, we create a folder
mocksfolder, and a file to hold our mocked API handlers.mkdir src/mocks && touch src/mocks/handlers.tsNote that you can use
.jsfiles if your project is written in JavaScript, but we're using TypeScript in our Taskhero project.Now, we can add our first mock. Let's mock our
/tasksGETendpoint and just have it return an empty array of tasks.// src/mocks/handlers.ts import {rest} from 'msw' import {getApiUrl} from '../components/api' export const handlers = [ // Handles a GET /tasks request rest.get(getApiUrl('/tasks'), (req, res, ctx) => { // Returns an empty array JSON response return res(ctx.json([])) }), ]💡 Notice here that we're using a
getApiUrlutil. This returns the full URL that we want to mock. This is important because MSW expects an exact URL match. So if your API fetches data fromhttp://localhost:8080/tasks, you have to specifyrest.get('http://localhost:8080/tasks')exactly, not justrest.get('/tasks').Next, to get it running with Jest (or any other Node-based test runner), create a file called
/src/mocks/server.ts.touch src/mocks/server.tsIn here, we'll start our server and pass in our handlers.
 // src/mocks/server.ts

 import {setupServer} from 'msw/node'
 import {handlers} from './handlers'

 export const server = setupServer(...handlers)
Now we need to start our server when we run our tests. To do this in Jest, we add the following code to a setup file.
Because we're using Create React App in our Taskhero app, we can simply add to our existing
src/setupTests.tsfile.Check out the MSW docs for how to set it up without CRA.
 // src/setupTests.ts

 import {server} from './mocks/server'

 // Start the server before all tests.
 beforeAll(() => server.listen())

 // Reset any handlers that we may add during individual tests,
 // so they don't affect other tests.
 afterEach(() => server.resetHandlers())

 // Stop the server after all tests have run.
 afterAll(() => server.close())
Now that our server is running during our test run, our requests in our tests will be intercepted!
Step 2: Writing our first test
Let's create an
App.test.tsxfile to contain tests for ourAppcomponent.touch src/App.test.tsxNow, we can write our first test. We'll test that the app displays the loading screen while the data is loading from the
/todosendpoint.import React from 'react' import {render, screen} from '@testing-library/react' import App from './App' import {GlobalWrapper} from './testUtils' it('shows the loading spinner while data is loading', () => { render(<App />, {wrapper: GlobalWrapper}) expect(screen.getByRole('alert', {name: 'loading'})).toBeInTheDocument() })Let's break down what's happening:
First, we render our
Appcomponent, wrapping it usingGlobalWrapperthat sets up all the context providers the app needs.Then, we try to get the spinner and expect it to be in the document.
And now we have our first test!
Sidenote on best practices: Query by role, and use screen
You'll notice two testing techniques here that I think are good practices.
Use
screenfor all your queries.Use
screen.getByLabelTextinstead ofconst {getByLabelText} = render(...). This just makes life a bit easier because you no longer have to keep adding methods to yourrenderdestructure.Query the same way a screen reader would.
This one is a bit more important. Rather than querying by test id, query elements by their accessible name. Not only does this make your tests more resilient to change (even if you completely change how you build your button, it's still a button), it also encourages you to write more accessible code.
These two insights came to me from Kent C. Dodds's excellent article, Common mistakes with React Testing Library, which I highly recommend reading.
Step 3: Dealing with loading states
Now let's test whether the app displays a "No tasks yet" message if the user doesn't have any tasks.
it('shows an alert if there are no tasks', () => {
    render(<App />, {wrapper: GlobalWrapper})
    expect(screen.getByRole('heading', {name: /No tasks yet/i})).toBeInTheDocument()
})
You'll notice our test fails. That's because when we do our expect, the data is still loading. So let's add some code to wait for the loading state to disappear:
-import {render, screen} from '@testing-library/react'
+import {render, screen, waitForElementToBeRemoved} from '@testing-library/react'

-it('shows an alert if there are no tasks', () => {
+it('shows an alert if there are no tasks', async () => {
     render(<App />, {wrapper: GlobalWrapper})
+    await waitForElementToBeRemoved(() => screen.getByRole('alert', {name: 'loading'}))
     expect(screen.getByRole('heading', {name: /No tasks yet/i})).toBeInTheDocument()
 })
Here we use DOM Testing Library's waitForElementToBeRemoved function to wait for loading to finish.
Step 4: Test-specific handlers
Next, we can test whether our app displays an error message if the API returns an error. To do this, we can overwrite our default handler for /tasks with another one that we include directly in our test:
(Remember, we added server.resetHandlers() to run after each test, meaning the following handler will only exist for this test.)
// src/App.test.tsx

import {server} from './mocks/server'
import {rest} from 'msw'
import {getApiUrl} from './components/api'

it('shows an error message if the API returns an error', async () => {
    // Inline handler just for this test
    server.use(
        rest.get(getApiUrl('/tasks'), (req, res, ctx) => {
            // Use ctx.status to return a specific status code
            return res(ctx.status(500), ctx.json({message: 'Internal server error'}))
        }),
    )

    render(<App />, {wrapper: GlobalWrapper})
    await waitForElementToBeRemoved(() => screen.getByRole('alert', {name: 'loading'}))
    expect(screen.getByRole('heading', {name: /error/i})).toBeInTheDocument()
    expect(screen.getByRole('alert', {name: /internal server error/i})).toBeInTheDocument()
})
But our test fails! The test can't find our loading state. Instead, the app just renders the "No tasks yet!" message immediately. This brings us on to one of the gotchas with testing a FE.
Watch out for caching
The issue we're experiencing above is because, the data fetching library we're using, SWR, caches responses. So if it has a cached response it'll return it immediately. A lot of data fetching libraries like SWR, React Query and Apollo Client, have this type of caching behavior that might cause issues.
To get around this, we need to clear SWR's cache between tests. To do this, add the following to afterEach in your test setup file:
+import {cache} from 'swr'

 afterEach(() => {
+    cache.clear()
     server.resetHandlers()
 })
We also need to add dedupingInterval: 0 to the SWRConfig in our GlobalWrapper component that wraps all our tests:
// src/testUtils.tsx

-<SWRConfig value={{fetcher: fetcher, shouldRetryOnError: false}}>
+<SWRConfig value={{dedupingInterval: 0, fetcher: fetcher, shouldRetryOnError: false}}>
Otherwise, SWR is going to wait a bit to see if there are any identical requests between renders that it can do as one call, meaning if we have two tests that call the same endpoint but that expect different responses, SWR is going to combine those two requests as one.
I might write a separate post on how to solve caching issues with all popular data fetching libraries. Let me know what data fetching library you use!
All our tests pass! What's next?
(You can see the completed code with everything we've added here, and see a diff comparison here)
Now you know how to set up MSW to test your front end, and how to write those tests. There is still plenty more to cover. In my next post we'll look at:
- Testing POST requests (testing inserting and updating tasks).
- Testing requests that have route parameters.
- Testing the list of tasks instead of just the empty state.
- What is useful to test, and what isn't.
- Where to put your tests.
- And much more.
And in a future post, I'll also cover how to set up MSW with Cypress for end-to-end tests.
If you want to be notified when I release the next posts, follow me on Twitter.
Also, feel free to Tweet at me if you have any questions.
If you found this post helpful, and you think others will, too, please consider spreading the love and sharing it.